I just recieved my DSO Quad from Boxtec/Seeedstudio. Because the documentation of this product is not really .. “ideal” I thought I write my steps down. 10 Years ago I used Oscilloscope for my daily job, however those were analog Oscilloscope and in another price class.
Make sure you can connect your battery by checking THIS forum thread.
You can find the official Quad manual (DSO Quad v2 6 Manual 0.92b.rar) in this thread.
I own the v2.6 Hardware running SYS v1.51 and APP v2.52. I downloaded the application firmware file AP3_P100, checkFirmware Upgrade Wiki for a detailed firmware update. Then I started the DSO Quad in the “Firmware Upgrade Mode” (press “> ||” during startup). The I copied the AP3_P100.hex (Note: the unzipped file!) file to the USB disk and waited until the file gets renamed to AP3_P100.rdy). When the file gets renamed, power cycle your Quad to finish the upgrade process.
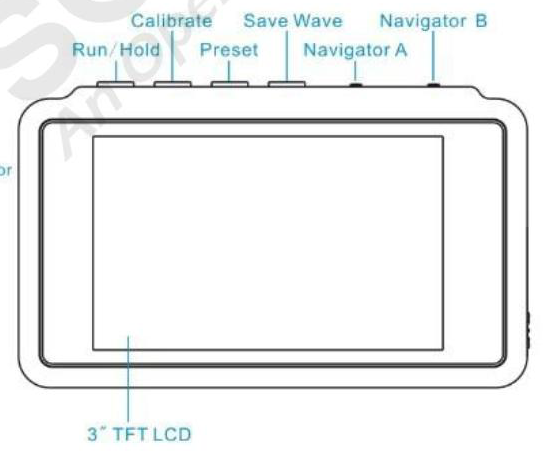
Here is an overview what kind of Keys the DSO Quad has:
Clik here to view.

- Run/Hold: is used to control working state of Quad: Working or Pause
- Calibrate: Press more than 2s to enter the calibrate mode if the active menupoint is a analog input.
- Preset: Save current setting (Signal Generator, Time dimensions?), they are loaded each time the Quad is started. Handy if you, for example, want to mute the beep.
- Sine Wave: Used to save a Screenshot
- Navigator B:Navigate in the main menus. Press change the Menu entry while push/pull change the current setting.
- Navigator A: Navigate in the submenu (after a menu was selected with Navigator B).
Calibration
You need to calibrate the device itself and the probes. You need an external power meter and a very fine screwdriver, I miss both utils so I didn’t adjust my DSO Quad yet.
Edit: the hifiduino blog entry about the Quad have some great tips about calibrate the device:
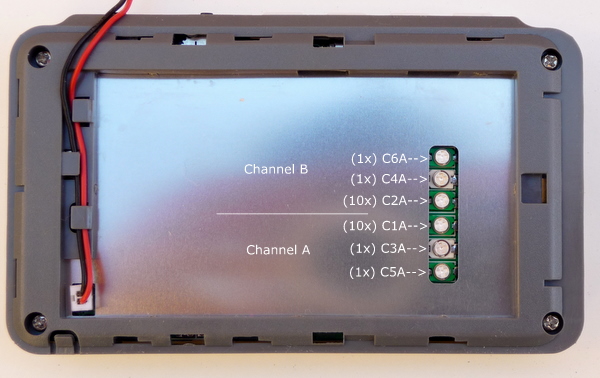
“One needs to know that the probes that come with the unit are not compensated. After quick schematic review I figured out that C3A and C5A adjust compensation for channel A, and C4A and C6A for channel B. These trimmer caps are accessible under the battery, btw”
Image may be NSFW.
Clik here to view.
- Use the built-in signal generator to generate a square wave. 10KHz is a good frequency to see the overshoot
- Connect one probe to the signal generator output and one probe to channel A or channel B (there is no need to connects the GNDs but you can connect them if you wish). Feed the signal to channel A (or channel B)
- In order to adjust the compensation capacitors you need a plastic screwdriver. Since I did not have one, I took a pen cap and sharpened the little plastic stick of the pen cap with sand paper
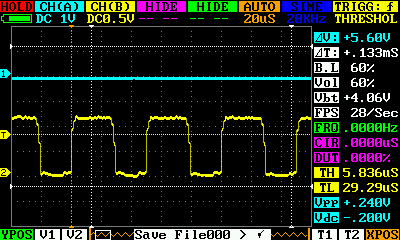
- Turn/adjust the caps until the overshoots are eliminated as shown in the picture below
Waveform generator
Some facts about the Waveform generator I found on the Forum:
- the output should be about2.6~2.8 Vpp
- a guy reported this issue in the Forum: “It correctly outputs a square waveform at any frequency 1Vpp. But when trying to set any other waveform, all I get is a square waveform with some modifications at the top part which vaguely reminds of a sine or sawtooth or triangular waveform but has nothing to do with any of them.”
The waveform looks like this:
Image may be NSFW.
Clik here to view.
I this case your DSO Quad has a hardware defect! (Unfortunately in my case the problem was not the double zener D6, but the op amp U7.)
Save Waveforms as BMP / Screenshot
Edit 21.3.2012: This step is obsolete!
In order to save a screenshot of the Quad, you first need to create some BMP Files and copy them to the internal 2MB USB Disk. The BMP Files need to have a resolution of 400×240 and a bitdepth of 4 (32Bit). I found the file “Save wave for DSOQuad.rar” on the Seeedstudio Forum, here is the readme:
1 2 3 4 5 6 7 8 9 10 11 12 13 14 15 16 | Module to save: Because there is no keyboard to input name of files, this module is needed: Copy the Filexxx.BMP or Filexxx.DAT, and rename the xxx to 000~999, from 000,001,002..... Save waveform as .bmp 1.Copy the Filexxx.BMP to the 2M USB disk, rename the xxx as 000,001,002...... 2.Navigate to the save menu, select "Save file","xxx(the one you select to use)" and ".BMP" 3.Push button 'S'(The forth button on QUAD) 4.Reset the Quad ,you will see the saved BMP in your USB disk. Save and recall .DAT 1.Copy the Filexxx.DAT to the 2M USB disk, rename the xxx as 000,001,002...... 2.Navigate to the save menu,select "Save fiel","xxx(the one you select to use)" and ".dat" 3.Push button 'S' to store the data into .dat file 4.In order to recall the data you stored in the USB disk, first navigate to the save menu, select the "load file""xxx(the one you want to recall)"and ".dat" 5.Navigate to the CHD, select the show mode as File_x(the data in which channel you stored ), and, you can get the recalled waveform . |
Use Navigator B to select the “Save File” dialog, then press the “Save Wave” Button.
Memory Slots:
The Quad has 4 different Memory slots, each slot can contain a different Application. The stock firmware is installed in Slot 1. You can select the slot by pressing a button during startup:
Clik here to view.

To start application form slot 4, hold the fourth button down while turning on the power.
3rd Party Firmware:
Hint: Firmware update on OSX does not work! OSX fills the disk with hidden files, the DFU disk appears/disappears in a 3s interval. My USB disk is also filled with garbage, I had to reformat it (on a Windows machine)
- DSO203 GCC Community Edition (installs in slot 1). You also need the SYS from Marco Sinatti
- https://github.com/gabonator/DS203
- Frequency response application (installs in slot 4)
- Logic Analyzer (installs in slot 3)
- Tetris (installs in slot 3)
Conclusion:
After working/playing with my Quad for about 3h I must say I can work with it. However the navigation is not very intuitive, maybe I change my mind if i keep working with the Quad. If you need an Oscilloscope now and then and you’re not operating in the GHz range, the Quad is a nice tool! However, never ever connect the Quad to OSX, the Quads internal SD memory get messed up. You need a Windows (or Linux) OS if you want to update the Firmware or get images from the Quad.
References:
- http://essentialscrap.com/dsoquad/freq.html
- http://hifiduino.wordpress.com/2011/04/30/dso-quad-quick-start-guide/
- Seeedstudio Forum
- Seeedstudio Wiki
- http://www.valky.eu/?data/hardware/ds203.txt
- Top 10 Things to Consider When Selecting a Digitizer/Oscilloscope
Competitors:
